Search
Related topics are listed below.
Adding a signature
Getting Started » Before your first Survey » Adding a signature
Adding your signature to a report is very easy after the first initial setup. To begin, we need to add your signature details in the SETTINGS. Use the menu at the top to select MANAGE and choose SETTINGS. From the menu on the left side of SETTINGS MODE…
Cover/Title pages
Setup Instructions » What is different from version 1? » Cover/Title pages
The cover and title pages used to be automatically formatted in version 1, however, for the purpose of returning more control to your report we have included a couple of new sections in the Project Data section for customizing the content of these pages. *The Vessel…
Adding images
Images and Attachments » Adding images
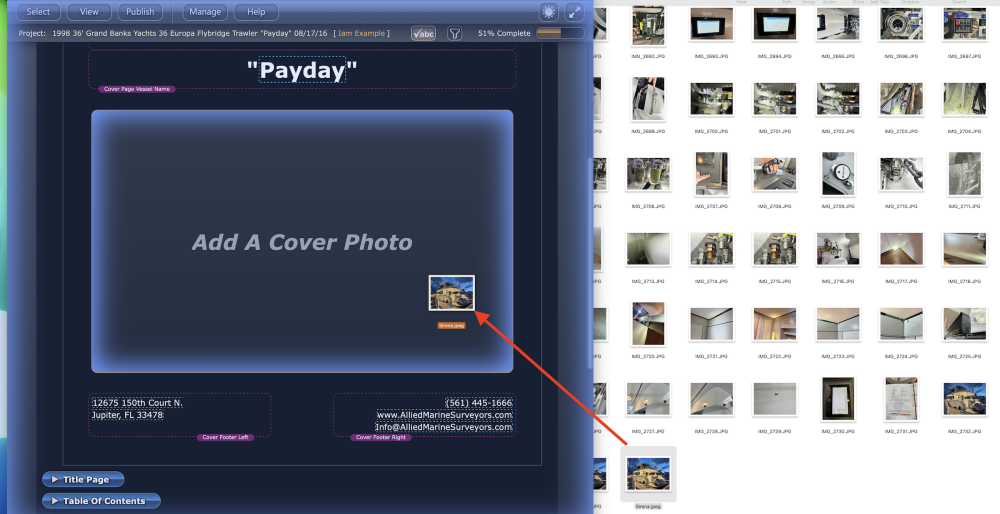
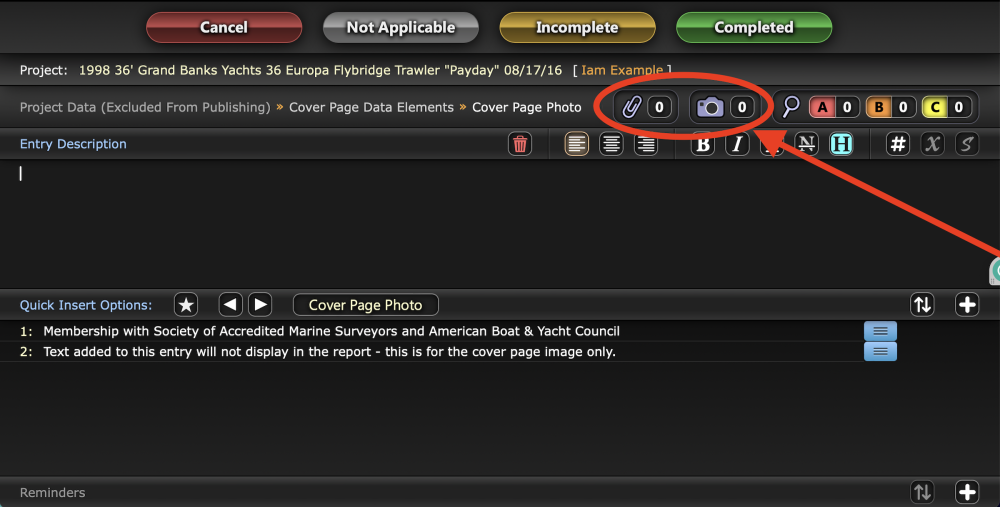
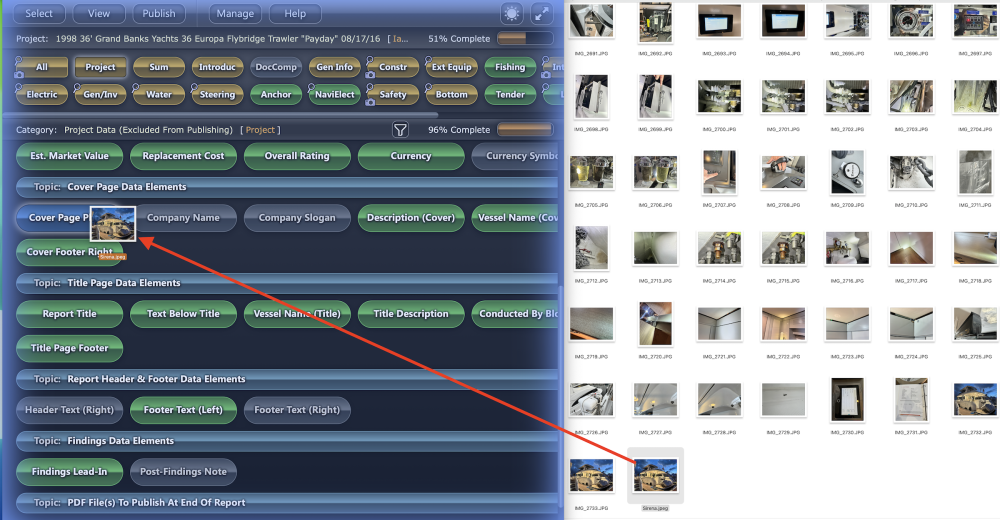
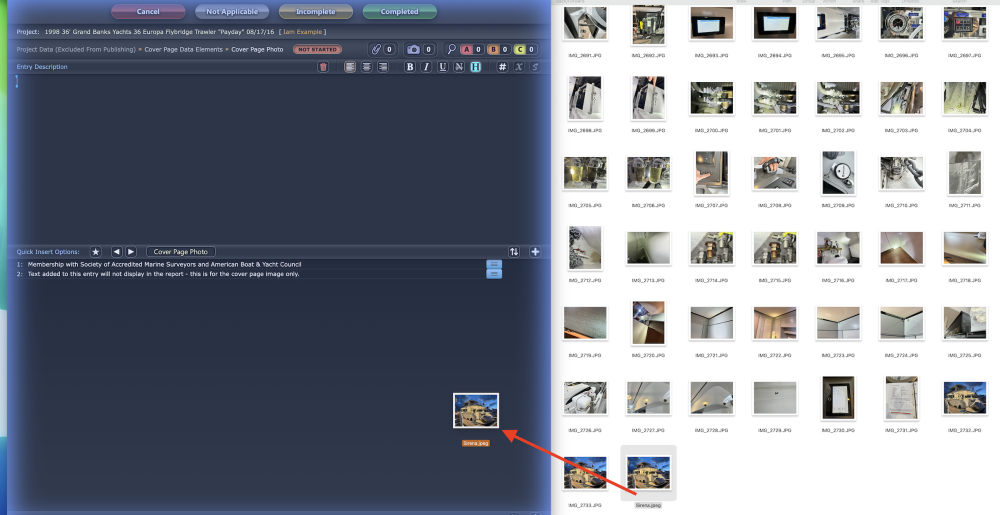
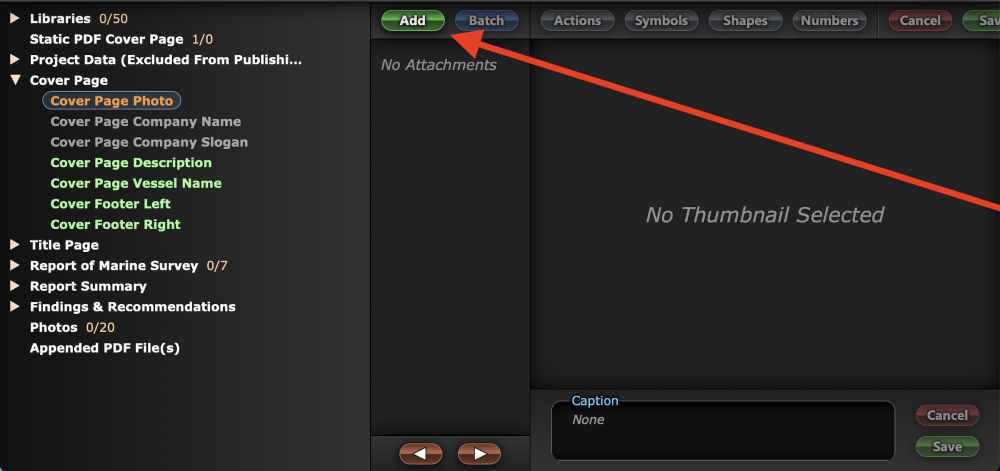
Images can be added almost anywhere in your report. Here are the easiest ways to add images to your report. 1. Drag and drop your images. Probably the easiest way to quickly add images throughout the report, simply drag and drop the image from any location on your…
The Publish Page
Getting Started » Before your first Survey » The Publish Page
UNDERSTANDING THE LAYOUT – The Publish Page The PUBLISH page is accessible from the menu at the top of most pages within the application. The primary action buttons on this page are as follows: Preview Report will publish the report in this same window…
The Findings Page
Getting Started » Before your first Survey » The Findings Page
UNDERSTANDING THE LAYOUT – The Findings & Recommendations Choose any button and select the Findings & Recommendations area in the upper right of the page. As before, at the top of this page is the option to Cancel without saving any changes, or the green Save…
The Project Selection Page
Getting Started » Before your first Survey » The Project Selection Page
UNDERSTANDING THE LAYOUT – The Project Selection Page The Project Selection Page is the first page that opens when you start InspectX and will eventually contain the searchable list of all your past survey projects. New projects can be created by pressing Start…
The Entry Detail Page
Getting Started » Before your first Survey » The Entry Detail Page
UNDERSTANDING THE LAYOUT – The Entry Detail Page At the top of every entry detail page you’ll find your primary controls. Cancel will exit this heading without saving your changes. Not Applicable will save and exit this heading marking it gray…
Deleting a Finding
Getting Started » Before your first Survey » The Findings Page » Deleting a Finding
There are three main ways to delete a finding. 1. If you are already in the finding section you can delete the finding by deleting the Finding and Recommendation text and selecting Save & Exit. A warning message will appear informing you about the deletion of this…
Copy a Configuration File
Customizing Content » Copy a Configuration File
Before making large changes to your configuration file I recommend making a copy. *This is extremely useful when designing a configuration file for other types of reports (damage, appraisals, etc.) or when creating a configuration file for a different language. 1.…
InspectX on a Mac
Welcome to the InspectX.v2 User Guide » InspectX on a Mac
I am a Mac myself and InspectX has been designed and tested to work on all Apple devices using various browsers. An important distinction should be made between using an Apple device for InspectX and installing the database on an Apple device. You can think of…
Access from a remote computer
Networking » Access from a remote computer
If you would like to host your own server and make your version of InspectX available over the internet there is an option for that, but it involves allowing internet access to the computer hosting InspectX which can only be adjusted on your home router. With this…
Access from a different computer
Networking » Access from a different computer
As you may already know, InspectX requires a computer running a Windows operating system, however, without any installation you can also access your version of the InspectX database from a Mac, iPad, Android, or any other device with a browser. For the purpose of…
Migrating a legacy (version 1) database
Backups » Migrating a legacy (version 1) database
Migrating the entire database is useful when changing computers or setting up an identical version of InspectX on a different computer. *NOTE: the two instances of InspectX will function completely independently of each other. In order to migrate your InspectX…
Images and Attachments
*Images can be added into four main areas of the survey report. On the Cover Page. See that section for more details HERE. In the body of the report. In the Findings & Recommendations section of the report. …
Project Data (new headings)
Setup Instructions » What is different from version 1? » Project Data (new headings)
The Project Data category has a few new buttons/headings. By popular request, we have added a few additional ‘substitute variables’ that can be automatically added within your report text. You’ll notice several additional headings inside the…
Initial Setup
Setup Instructions » Initial Setup
Congratulations! If you just installed InspectX you’re one step closer to publishing professional survey reports in record time. *If you are a current InspectX user and would like to convert your projects and files over to the new system, please see the…
Vessel with no name
Common Questions » Vessel with no name
The vessel name is not a required field, so you can simply leave it blank if the vessel has no name. That being said, there may be numerous areas throughout your report that include statements referencing the vessel’s name, and when this field is left blank…
What is different from version 1?
Setup Instructions » What is different from version 1?
InspectX v2 is a complete redesign of the application, but a very strong focus was to keep the basic operation and functionality the same (or easier) than it was in version1. The purpose of this was to keep the learning curve to a minimum, especially for surveyors…
Rotating images
Images and Attachments » Rotating images
The orientation of an image is determined in the camera from which the image was taken. Most modern cameras (especially phones) will take an image in any orientation and add meta-data into the image so that it may appear upright even when the image is in fact…
InspectX 2 Automatic Backups
Backups » InspectX 2 Automatic Backups
Backup your Survey projects! I don’t need to tell you how important saving backups can be. This page will cover what you need to know about saving your backup files. InspectX backups are saved locally on your computer. The location of these backups can be…
Outline Mode
Getting Started » Before your first Survey » Outline Mode
UNDERSTANDING THE LAYOUT – The Outline Mode/View The Outline View displays the contents of your report in an outline layout more closely representing a long page. Topics can be opened by clicking the arrows on the left, and full sections can be expanded by…
Navigation Menus
Getting Started » Before your first Survey » Navigation Menus
At the top left of the page are the main navigation menu options. The SELECT button lets you navigate back to the Project Selection page, or change configuration files (if you have more than one stored). If you have multiple configuration files, the selected…
Before your first Survey
Getting Started » Before your first Survey
It’s important to familiarize yourself with the software before attempting your first survey in the field. I fully understand your excitement to get out in the field and start surveying with InspectX, however, to ensure the highest level of success, I suggest…
Welcome to the InspectX.v2 User Guide
The Future of Marine Survey Report Writing InspectX is a powerful tool for writing survey reports and has a track record proven to save users time. Like anything, the benefits come after dedicating a little time to customize the content to suit your survey…
Valuation / Currency symbols formatting
Setup Instructions » What is different from version 1? » Valuation / Currency symbols formatting
In the previous version of InspectX we automatically formatted the substitute variables for the Estimated Market Value and Replace Cost fields. Specifically, the Estimated Market Value and Replace Cost numbers were automatically formatted with commas and the…
Sharing InspectX files
Backups » Sharing InspectX files
InspectX project files, configuration layouts and settings can be shared between computers but all of these files need to be IMPORTED into InspectX and cannot be ‘Opened’ by double-clicking the file. *Files from InspectX version 1 can be shared to version…
Creating multiple findings
Getting Started » Before your first Survey » The Findings Page » Creating multiple findings
UNDERSTANDING THE LAYOUT – The Findings & Recommendations You can create multiple findings under the same heading if you choose, even findings of the same priority level (A, B or C). To create a new finding of the same priority when one already exists there…
Change Credit Card
Common Questions » Change Credit Card
Changing the credit card you have saved on file is easily be done during the checkout process or by signing into your account HERE. You can also change your company name or email address associated with your InspectX purchase account from that page. …
InspectX: Legacy Conversion
Setup Instructions » InspectX: Legacy Conversion
Converting from a legacy version of InspectX If you are a current InspectX user with projects and settings you’d like brought over to the new version of InspectX, this page will provide some guidance. You’ll notice that InspectX 2 has a tray icon running…
Changing table layout size
Formatting the Report » Changing table layout size
Some parts of your survey report may be presented in a table layout, where the headings are to the left and the content to the right. *You can adjust the width of the columns if needed, so that your content displays the way you want. Here’s an example below…
Substitute Variables
Setup Instructions » What is different from version 1? » Substitute Variables
‘Substitute variables’ are utilized to automatically fill sections of information that may be repeated in several places throughout your report. For example, the ‘Vessel Year’ is likely to be repeated numerous times, and rather than manually…
Button Mode
Getting Started » Before your first Survey » Button Mode
UNDERSTANDING THE LAYOUT – Button Mode/View The Button Mode is best used to navigate through different sections of the report quickly. The rows of buttons at the top of the page are your primary Categories, and these give you quick access to jump to that section…
PDF Protection
Formatting the Report » PDF Protection
By default your generated PDF reports have the standard Adobe PDF protection enabled. This protection enables viewing and printing but prevents editing (including copying) without a password. If you wish to further edit a PDF report (outside of InspectX), or if you…
Installation Instructions
Setup Instructions » Installation Instructions
Step 1. From your Windows tablet or computer, click the DOWNLOAD link from that page of InspectXpro.com or click here. Click SAVE or OPEN when prompted. Note: you may need to select ‘keep’ to allow the program if your Windows security does not recognize…
Networking
Networking
Options for connecting to InspectX from other computers The following sections will contain options and instructions for connecting to your InspectX database from other devices through a wireless connection. If you want to access InspectX from another device on the…
System Requirements
Welcome to the InspectX.v2 User Guide » System Requirements
InspectX uses Microsoft Sequel Server 2014 (or 2016) Express which has the following requirements: Operating Systems Windows 11, Windows 10, Windows 7, Windows 7 Service Pack 1, Windows 8, Windows 8.1, Windows Server 2008 R2, Windows Server 2008 R2 SP1, Windows…
Database Backup/Restore
Backups » Database Backup/Restore
Migrating the entire database is useful when changing computers or setting up an identical version of InspectX on a different computer. *NOTE: the two instances of InspectX will function completely independently of each other. In order to migrate your InspectX…
The Project File
Backups » Sharing InspectX files » The Project File
The project file contains all the textual input at each heading of that project, including pictures. The placement of this information within a survey report is directly dependent on the configuration file it was made with. If you think of the textual input within…
Connecting two computers in the field
Networking » Connecting two computers in the field
If you want to use an Apple device in the field you have the ‘online’ option covered here, or you can create a portable network in the field. This can be done using your phone’s hotspot option but this is not an ideal long-term solution. I would…
InspectX Language Compatibility
Customizing Content » InspectX Language Compatibility
We made several changes to InspectX to improve the compatibility for use in multiple languages. The textual content of any part of the report can be modified to the language of your choice, including the sections, headings, Findings & Recommendations and of course…
The Configuration File
Backups » Sharing InspectX files » The Configuration File
The configuration file contains the category/button names, their specific location/order as well as all the ‘quick insert options’. Different configurations can be used for different types of reports (Yacht and Small Craft, Appraisals, Damage, Facility…
The Settings File
Backups » Sharing InspectX files » The Settings File
The settings file contains your company details, inspector signatures and all of the settings related to the specific formatting of the report. Keeping this file separate means you can share the layout of a project as well as its content without sharing your company…
Customizing Content
Customizing Content
InspectX is an extremely powerful tool for creating an outline for almost any kind of report. This section will outline just some of the ways the content can be customized to your specific needs. I hope you find a way to make a layout specifically unique to your own…
Re-order images
Images and Attachments » Re-order images
No matter where your images are added, you can re-order the position of these images by dragging around the thumbnails in the Attachments Manager.
Purchase Process
Common Questions » Purchase Process
We do our best to make sure every step of the report-writing process goes as smoothly as possible. The credit card payment processing requires communication between online servers and banks, and this is not always immediate. We do our best to prevent duplicate…
Server Error in Application
Common Questions » Server Error in Application
*If you are having trouble with the initial installation the solution below is not for you. I recommend a phone call for installation issues: (1) 561-600-0098 InspectX utilizes some background Microsoft and Windows features to operate. It is rare, but on occasion…
Desktop Icon
Getting Started » Desktop Icon
The desktop icon After installation, you should notice an InspectX Icon on your desktop as well as a service running in your system tray. *InspectX can be opened from any browser of your choice using the address: http://localhost:44444 No internet connection…
Backups
Backups
Backing up InspectX By default, InspectX is set to automatically backup all projects and data to the the root folder where InspectX is installed. This is usually: C:\Program Files (x86)\InspectX 2\Backup You can change the location of your backups inside…
Valuation / Currency symbols
Setup Instructions » What is different from version 1? » Valuation / Currency symbols
As with most of the fields in the Project Data category, the Currency and Currency Symbol are optional, but can potentially help to autofill various areas of the report for efficiency. For example, since all my survey reports are performed in the USA, I have little…
Resize InspectX
Getting Started » Resize InspectX
You can adjust the font size, Category layout and Heading layout inside for the InspectX interface in ‘Settings Mode’. In addition, the size of the text and buttons in InspectX can be adjusted using your browser’s ‘zoom’ function.…